
Tickler Reports provide a list of employees who require that some action be taken to keep their employment or pay status current.
Related References
How to Generate a Tickler File Report
From the Personnel module, Reports menu, follow these steps to generate a Tickler File.
- Select Tickler File. The Tickler Reports criteria selection screen appears, which permits you to designate how names display, address options, and so on. (Learn more about the criteria fields and buttons below.)
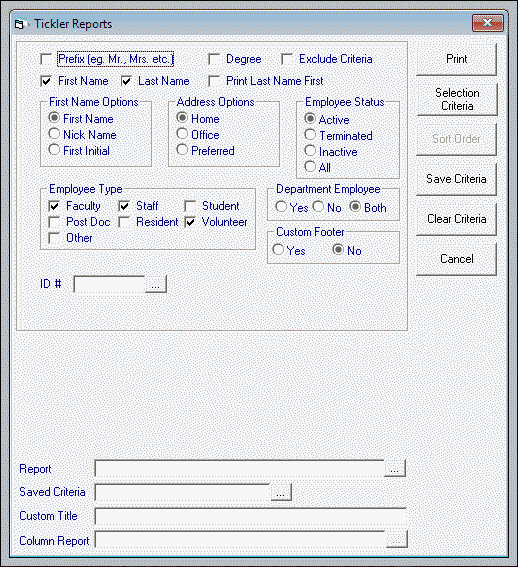
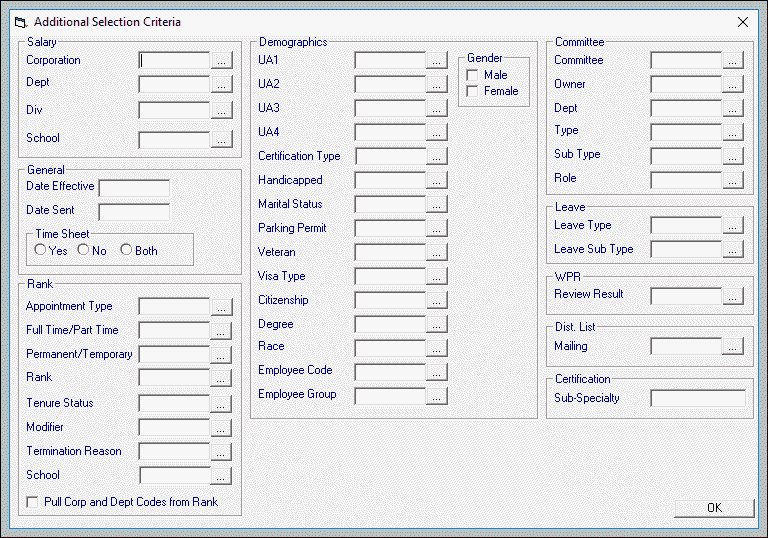
- Click Selection Criteria if you wish to filter your report even further. Select the desired criteria and click OK to return to the previous screen.
- Select the desired report format from the drop-down menu in the Report field.
- Click Print to generate the report, which will appear in a separate window once generated.
- Print or Export the report, as desired. A dialog box appears. Click OK.
- IF you have selected Export, the system will prompt you to designate a file location for the exported file. You will be able to view and manage your exported report there.
Understanding Fields and Buttons in the Tickler File Criteria Selection Screen
|
Selection Criteria Field |
Selection Criteria Field Description |
|
Prefix (Mr., Mrs., etc.) |
Select this option if you would like employee prefixes to appear on the report. |
|
Degree |
Select this option if you would like the employee’s degree information to appear on the report |
|
Exclude Criteria |
|
|
First Name |
Select this option if you would like all or part of the employee’s first name to appear on the report. (See First Name options below for the format you would like the first name to appear) |
|
Last Name |
Select this option if you would like the employee’s last name to appear on the report |
|
Print Last Name First |
Select this option if you would like the employee’s last name to appear first (before the first name) on the report |
|
First Name Options Radio Button (select one from the choices below) (First Name above must be checked for this option to be available) |
|
|
First Name |
Select this button for the employee’s first name to appear on the report |
|
Nick Name |
Select this button for the employee’s nick name to appear on the report |
|
First Initial |
Select this button for the employee’s first initial to appear on the report |
|
Address Options Radio Buttons (select one from the choices below) |
|
|
Home |
Select this button for the employee’s home address to appear on reports containing address information |
|
Office |
Select this button for the employee’s office address to appear on reports containing address information |
|
Preferred |
Select this button for the employee’s preferred address to appear on reports containing address information. The preferred address is defined in the “Office Address” tab of the Personnel data entry screen |
|
Employee Status Radio Buttons (select one from the choices below) |
|
|
Active |
Allows the user to run reports for active employees only |
|
Terminated |
Allows the user to run reports on terminated employees only |
|
Inactive |
Allows the user to run reports on inactive employees only |
|
All |
Allows the user to run reports on all employees regardless of status (active, terminated and inactive) |
|
Employee Type (select as many as you wish from the choices below, but at least one option needs to be selected) |
|
|
Faculty |
Select this option to include faculty on the report |
|
Staff |
Select this option to include staff on the report |
|
Student |
Select this option to include students on the report |
|
Post Doc |
Select this option to include post docs on the report |
| Resident | Select this option to include residents on the report |
| Volunteer | Select this option to include volunteers on the report |
| Other | Select this option to include other employees on the report |
|
Department Employee Radio Button |
|
|
Yes/No/Both |
Select a radio button (yes, no or both) to determine if department employees will be included on a report |
|
Custom Footer Radio Button |
|
|
Yes/No |
Allows the user to select if a custom footer will appear on the report |
|
ID# |
Allows the user to run a report for an individual employee |
|
Date/as of date |
Allows user to select an effective date for the report |
|
Buttons (in a column on the right side of the screen) |
|
|
|
Allows user to run the report (so that it appears on the screen). Select this option once the selection criteria option is complete and a report format has been selected |
|
Selection Criteria |
Provides the user with an additional selection criteria screen discussed below |
|
Sort Order |
Allows the user to determine the order (through a sort order screen) that the data will appear on the report. This feature is only available on selected report formats |
|
Save Criteria |
Allows the user to save the selected criteria for future use. When the “Save Criteria” button is selected, the user will be asked to name the criteria. May be retrieved at a later date |
|
Clear Criteria |
Allows the user to clear the selected criteria |
|
Financial Criteria |
Allows the user to set additional criteria of the financial nature |
|
Report |
Allows the user to select a report format. The user can select from the drop-down list by selecting the button to the right of the field |
|
Saved Criteria |
Allows the user to retrieve previously saved select criteria. The user can select from the drop-down list by selecting the button to the right of the field |
|
Custom Title |
Allows the user to change the title printed on the report. The user may enter the desired title |
Sample Report
Following is a sample of a Tickler File report, formatted by Salary Source Ending Date.
