
Department Manager allows you to enter non-budget transactions through the Transaction Data Entry screen.
Please note: initial Budget transactions and any budget adjustments are made on the Budget Data Entry Screen
Entering Transaction Data
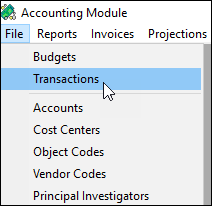
- In the menu, click File.
- Click Transactions.
If the individual user’s security is set up without account or cost center limitations, they will go directly to the transaction data entry screen.
If the user is limited, they will be prompted to enter an account and/or cost center and click OK. This will take them directly to the selected account. Clicking All will direct them to a list of all of their accessible accounts.
Toolbar Definitions

- Close: closes the screen.
- Edit: edit information contained in the Transaction Data Entry screen.
- Insert: add a new record.
- Delete: deletes the record. Deletes a row if a row is highlighted. For both deleting a record and deleting a row, a pop-up box appears asking the user to confirm.
- Undo: undoes last action or entry.
- Print: prints information on the transaction screen. Choose to print the current screen, or multiple references.
- Arrow: takes user to the first record in the database.
- Arrow: takes user to the previous transaction/record.
- Arrow: takes user to the next transaction/record.
- Arrow: takes user to the last transaction/record.
- Recon: reconciles transactions and accounts.
- Visa: reconciles VISA transactions.
- Copy: copies the transaction detail to a new record.
- Change: change the “header” information, such as reference numbers, for a given transaction.
- Form:
Reference Fields
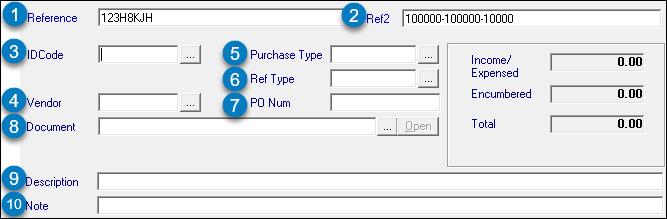
- Reference #: a unique number assigned to set of related transactions. The set of transactions may be encumbrances or expenditures for a specific purchase. These transactions are linked together by a common reference number. Examples of some reference numbers are purchase requisitions, check request, and travel authorization numbers. Reference numbers can be manually entered, or automatically assigned.
- Reference 2: allows the user to set up an additional source for tracking transactions. Reference 2 can be used in conjunction with the first reference number to assign a unique combination of reference numbers. The pair of reference numbers must be unique to each transaction. If the user does not enter a value into the field, the system will default to 'None.'
- ID Code: categorizes transactions and used by the ID Code Report to track all transactions associated with a given ID Code. Only ID Codes that have been previously entered in the ID Code table can be used. If the user does not enter a value into the field the system will automatically default to 'None.'
- Vendor: enter the vendor code, or select the vendor code from the drop down list.
- Purchase Type: enter the purchase type code, or select the code from the drop down list.
- Reference Type: an additional grouping for reference numbers.
- PO Num: the Purchase Order number assigned by the Purchasing Department.
- Document:
- Description: any text describing the transactions. The description is displayed on the breakdown reports, up to 120 characters.
- Note: any notes that may be related to the reference number, up to 250 characters. Information entered in the note field is not printed on any reports.
Transaction Fields
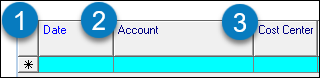
- Date: the date when the transaction occurred with the format MM/DD/YY. If the date field is left blank, it will automatically be filled in with the date on which the data entry is being performed or with the date entered with the data entry date option.
- Account: links the transaction with the correct account number. Used by the account reports to track all transactions associated with a given account. Only account numbers that have been previously entered in the account table can be used. The drop-down menu will display all valid accounts.
- Cost Center:identifies expenditures from cost centers such as a faculty member’s start up funds or one year in a multi-year grant. Only cost centers that have been previously entered in cost center table can be used. The drop-down menu will display all valid cost centers.

- Account 2: for installations running more than one account number for the same fund.
- Object Codes: minor, major, and budget codes. Only object codes previously entered in the object code table can be used. The drop down menu can be used to display all valid object codes.
- Encumbered: the dollar amount encumbered. It may be a positive or negative number. Income is entered as a negative number.
- Income/Expensed: the dollar amount expensed. This number may be a positive or a negative number. Income is entered as a negative number
- Campus Date: contains the date the transaction was reconciled. Dates are entered in the following format: MM/DD/YY. The use of this field is further explained in the reconciling section of this help documentation.
- Check #: the check number information for the transaction.
- Invoice # the invoice number information for the transaction.:
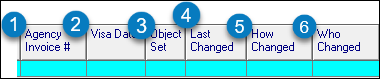
- Agency Invoice:
- Visa Date: the Visa statement date or the Visa transaction date.
- Object Set: the object set associated with the account number. Fills in automatically when the account number is entered into the row.
- Last Changed: automatically populates the last date a change was made. Users cannot manually modify this field.
- How Changed: automatically populates a code indicating how the transaction was changed. An example of this value would be M for a manual change, E for an electronic change, and Y for year-end transfer. Users cannot manually modify this field.
- Who Changed: automatically populates a code indicating how the transaction was changed. An example of this value would be M for a manual change, E for an electronic change, and Y for year-end transfer. Users cannot manually modify this field.
Totals and Display Fields

- Income/Expensed: the total of the income/expensed column for the reference number.
- Encumbered: the encumbrance column for the reference number.
- Total: the expensed and encumbered columns for the reference number.