
As you start setting up Accounts in Department Manager, you will need to perform these tasks:
- Select a Start date for transaction detail
- Determine how to bring in year-to-date transactions
- Understand the concept of starting balances
- Load budgets
Following is an introduction to each of these tasks.
Before You Begin
- Acquaint yourself with the Accounting Module, its menus and functions here.
Selecting Start Date and Determining Year-to-Date Transactions
One of your first decisions as you begin data entry is to determine a start date. This will be the effective date for loading your transaction detail into the software. The optimal time to start tracking transactions is at the beginning of the fiscal year. However, this is not always feasible.
If you have passed the beginning of the fiscal year, you will need to make these decisions:
| Decide... | THEN consider... |
|
to enter detailed transactions that go back to the beginning of the fiscal year? OR to enter summary-level data from the beginning of the fiscal year to the starting point of transaction data entry? |
For example, it is February 1st and you are just starting to use the software and the fiscal year began July 1st. Do you want to go back and enter or electronically load all of the transactions from July 1-January 31st? If this is a feasible alternative for you, it will provide you with the best information for the fiscal year. If you cannot get the transaction detail in an electronic format or you can’t enter the information, how will you get your year-to-date information in? Another alternative would be to enter the year-to-date expenses by object code, by account through January 31st, and start transaction data entry February 1st or some combination of the two alternatives. |
| when to start live/current data entry and how/if you will bring in year-to-date information. | If you bring in year-to-date information, it is important to validate the data brought over to ensure that it agrees to your General Ledger System. |
| whether to load the year-to-date transactions electronically | Discuss this choice with your support representative so that they can help facilitate the process. |
Understanding Starting Balances
Regardless of when you start tracking detailed transactions, you will likely need to bring in starting balances for your accounts.
| IF the account... | THEN... |
| has a budget |
you can start from the Budget Data Entry screen, discussed below. For example, if you have a grant account that started in April, and you are tracking transaction detail beginning July 1st, you may want to load your June 30th budget balances for the grant in the Budget Data Entry Screen. |
| is a revolving account or account that carries a cash balance from year to year |
you will need to enter the cash balance or carryforward date on your Effective Date of the system so that you can capture all balances going forward. This would be done on a Transaction Data Entry screen, shown below. |
Note: In most cases, the budget for one Account or Cost Center for one year is entered on one screen. When Cost Centers are being used to track special commitments or manage budgeting units, they should not be entered on the same screen as Account budgets. It is appropriate to set up Cost Center budgets with Account budgets if the Cost Centers are being used as sub-accounts.
Entering Data into the Budget Data Entry Screen
The Budget Data Entry screen is where you make the initial budget and any adjustments to the initial budget.
Begin budget data entry from the Accounting Module's File menu:
-
Click File/Budgets. The Budget Data Entry screen appears. (The first time you enter budgets, this screen will be empty.)
- Fill in the budget data as described next. You will find an explanation of the screen design and definitions for the various fields.
Understanding Budget Data Entry Screen Sections
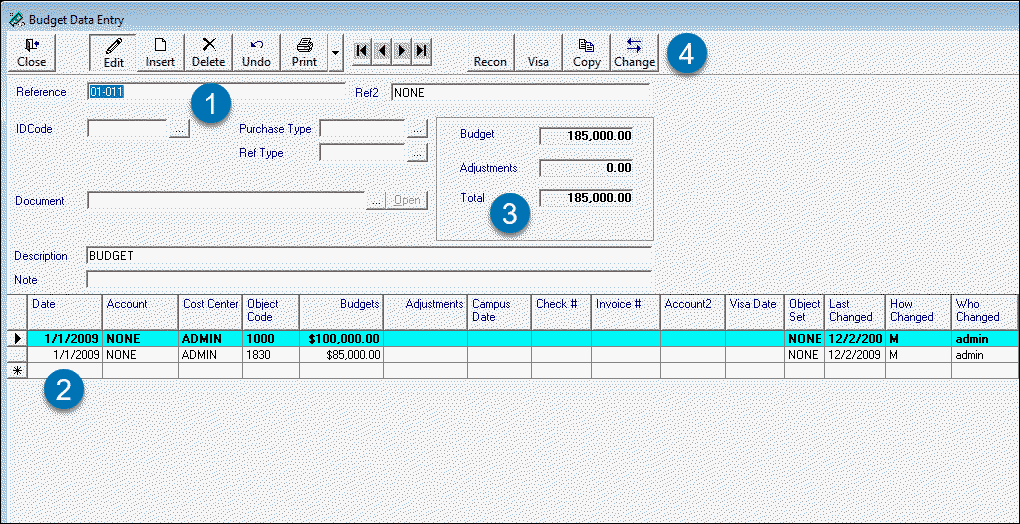
The Budget Data Entry screen is divided into four sections.
![]() Reference number information is entered in the first section, located in the top left of the display. This section is the master or reference section of the screen. The cursor is located here when you first select the data entry screen.
Reference number information is entered in the first section, located in the top left of the display. This section is the master or reference section of the screen. The cursor is located here when you first select the data entry screen.
![]() The second section contains detailed information about the budget, such as Accounts, Object Codes, Cost Centers, and Budget Amounts and Adjustments. It contains rows and columns for multiple account entries for a given reference number. This section is located in the bottom half of the display screen, referred to as the budget transaction section.
The second section contains detailed information about the budget, such as Accounts, Object Codes, Cost Centers, and Budget Amounts and Adjustments. It contains rows and columns for multiple account entries for a given reference number. This section is located in the bottom half of the display screen, referred to as the budget transaction section.
![]() The third section is located in the upper right of the screen. It displays the total amounts of the initial budget and adjustments. This section of the display screen cannot be accessed by the user and therefore serves as a "display only" section. It automatically updates when the cursor is moved off the current row of the grid or is moved from the transaction section to the reference section.
The third section is located in the upper right of the screen. It displays the total amounts of the initial budget and adjustments. This section of the display screen cannot be accessed by the user and therefore serves as a "display only" section. It automatically updates when the cursor is moved off the current row of the grid or is moved from the transaction section to the reference section.
![]() The last section consists of the toolbar that runs across the top of the screen. This section displays buttons for particular operations that the user may need to perform during data entry. Learn more about using the toolbar here.
The last section consists of the toolbar that runs across the top of the screen. This section displays buttons for particular operations that the user may need to perform during data entry. Learn more about using the toolbar here.
Understanding Budget Data Entry Fields
The table below provides a description for each of the fields in the Budget Data Entry screen.
|
Reference |
Description |
|
Reference # |
Reference numbers are used to group related transactions. The group of transactions may be an initial budget for an account or cost center or a single budget adjustment. These transactions are "linked" together by a common reference number. This field cannot be left blank. If no reference number has been assigned to the transaction, the system will automatically assign a reference number for you. This occurs by pressing the Next Ref button that is displayed under the Reference # field when the Budget Data Entry Screen is on a blank record. The Next Reference function must be set up; to do so select File/Options/ Assign Reference Number. The user defines the prefix, starting reference number, and the length. The reference numbers will then be assigned in alphanumeric order. Most users use the following reference number format when entering the beginning balance for accounts or cost centers: BBnnnnn BB stands for the beginning balance. nnnnn represents the Account number or the Cost Center If this convention is used, all beginning balance transactions will be kept in the same area of the database. This makes it easier for the user to find them. We recommend the above convention for assigning reference numbers for budget transactions. |
|
Reference 2 |
This second reference number allows the user to set up an additional source for tracking reference numbers. The reference 2 number can be used in conjunction with the first reference number to assign a unique combination of reference numbers. An example would be that the first reference identifies the Account number and the second reference identifies the Budget Year or Budget Revision number. The pair of reference numbers must be unique to each transaction. If the user does not enter a value into the field, the system will automatically default to None. We recommend that this convention be used for the different years of the Account or Cost Center. |
|
ID Code |
The ID Code is used to categorize transactions. This entry is not required. It is used by the ID Code Report to track all transactions associated with a given ID Code. ID codes may refer to different types of budget entries. While use of the ID Code is similar to the object code, it allows the user to keep track of items that are purchased under the miscellaneous object line, or items that are subsets of object lines. Only ID Codes that have been previously entered in the ID Code table can be used. The (icon) drop down menu displays all valid ID Codes. If the user does not enter a value into the field the system will automatically default to None. |
|
Reference Type |
This field is used like the ID Code field, in that it allows the user to define an additional grouping for reference numbers. If the user does not enter a value into the field the system will automatically fill in a value of None. |
|
Description |
The description may be any text describing the transactions. This description is displayed on the breakdown reports. This field allows up to 120 characters. Note: Users should be careful not to enter long descriptions. Long descriptions will "word wrap" when printing breakdown, Cost Center, Object Code reports and can significantly increase the length of the report. |
| Note | This field is used for any notes that may be related to the reference number. This field allows up to 250 characters. Information entered in the note field is not printed on any reports. |
Entering Data Into the Transaction Data Entry Screen
Transaction information includes the Account Codes and dollar amounts that describe the details of an initial budget or a budget adjustment for a given reference number. There may be multiple budget lines of budget entries per reference number pair. This information is stored in a grid. The grid consists of rows and columns that contain the multiple entries for the reference number pair.
The title for each field is listed at the top of each column in the grid. Each transaction is entered in a single row. When multiple transactions exist, Date, Account number, and then Object Code order the rows.
Understanding Transaction Data Entry Fields
There are 14 fields in the detail section of the budget data entry screen, described next.
|
Transaction Fields |
Transaction Field Descriptions |
|
Date |
The first field is the date when the transaction occurred. Dates are entered with the following format: MM/DD/YY. If the date field is left blank, it will automatically be filled in with the date on which the data entry is being performed, or with the date entered with the data entry date option. |
|
Account |
The second field is the Account field. It is used to link the transaction with the correct account. The account number is used by the account reports to track all budgets transactions associated with a given account number. Only Account codes that have been previously entered in the account table can be used. The drop-down menu will display all valid account numbers. |
|
Cost Center |
The third field is the Cost Center field. It is used to link transactions with Cost Centers. These codes identify budgets and adjustments for Cost Centers, such as a faculty member’s start-up funds or one year in a multi-year grant. Only Cost Centers that have been previously entered in the Cost Center table can be used. The drop-down menu can be used to display all valid Cost Centers. |
|
Object Code |
There are three types of Object Codes: minor, major, and budget codes. Only Object Codes previously entered in the Object Code table can be used. The drop-down menu will display all valid object codes. In most cases, funds are budgeted to the "major" code or "budget" code. |
|
Encumbered |
This field is used to enter the dollar amount encumbered. It may be a positive or negative number. If more than four digits are entered, the system will automatically fill in the commas. |
|
Income/Expense |
This field is used to enter the dollar amount expensed. This number may be a positive or a negative number. |
|
Campus Date |
This field contains the date the budget transaction was reconciled. Dates are entered in the following format: MM/DD/YY. This field is filled in during the reconciliation procedures or when the user presses the F7 key. |
|
Check Number |
This field contains the check number information for the transaction. |
|
Invoice Number |
This field contains the invoice number information for the transaction. |
|
Account 2 |
This field is used by installations of The Department Manager software, running two accounts numbers for the same fund. |
|
Object Set |
This field contains the object set associated with the account number. It fills in automatically when the account number is entered into the grid. |
|
Last Changed |
This field is automatically filled in by the system with the last date a change was made. Users cannot manually modify this field. |
|
How Changed |
This field is automatically filled in by the system with a code indicating how the transaction was changed. The codes are M for manual change, E for an electronic change, and Y for year-end transfer. Users cannot manually modify this field. |
|
Who Changed |
This field is automatically filled in by the system with the user ID of the last person who made a change. Users cannot manually modify this field. |
Totals/Display Section
The user cannot modify this section of the database. This section is "Display only."
|
Initial Budget |
Displays the total of the budget column for the reference number |
|
Adjustments |
Displays the total of the adjustment column for the reference number |
|
Total |
Displays the total of the initial budget and the adjustment columns for the reference number |
Using the Toolbar
The Data Entry toolbar controls various operations and permits you to navigate easily. Descriptions follow for its various functions.

